
What are MC4 Connectors and what do I do with them?
Your shiny new solar panels have just been delivered. You can’t wait to get them on the roof of your van and start generating your renewable energy. Off-grid adventures, here we come! But what’s this weird plastic part on the end of the cable, and what do I need to do with it?
These are MC4 solar connectors. You’ll need to learn how to install your MC4 solar connectors if you want to add a solar array to your campervan. However, if you want to avoid the hassle of sourcing all these components, you can buy a solar system. These solar systems come with all the cable and MC4 connectors you could ever ask for.
This guide will unpack everything you need about MC4 connectors and how to install MC4 solar connectors, ensuring you’re well-equipped to get your solar array up and running. Of course, if you want the easy, albeit more expensive option, you can skip the MC4 connectors by opting for Victron’s pre-terminated solar cable.

What are MC4 Connectors?
MC stands for Multi-Contact (the company which first came up with the idea), and the 4 represents the 4mm diameter.
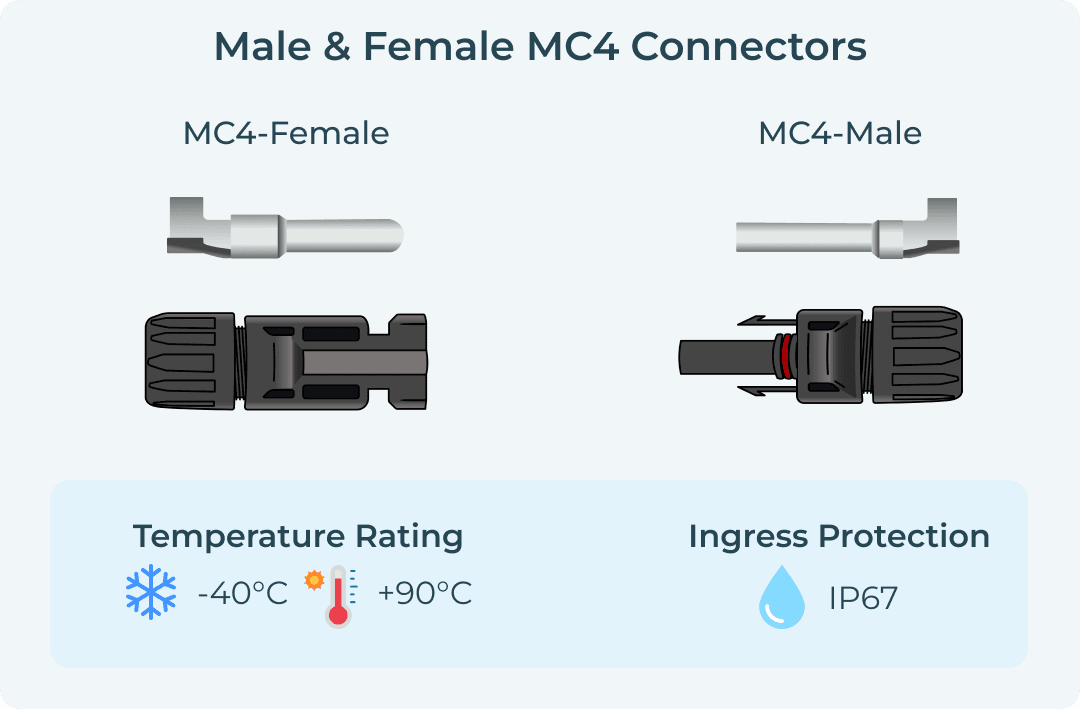
The connectors are IP67 rated, which means they have ingress protection against water and particulate matter. In non-sciencey speak, they are completely water and dustproof. So you can rest easy knowing they are perfectly at home on the roof of your campervan in a wild Scottish winter.
They are even rated at -40°C and +90°C, so it’s doubtful that these connections will bother you once installed. They are the industry standard for connecting solar panels and are now used worldwide. Connecting solar arrays of all sizes, from your campervan roof to entire fields of solar panels.
When you buy MC4 connectors, they will arrive as a pair with a male and female connector. Don’t connect these until your solar panels are on the roof and you know how to join them.

What do I need to do with them?
Your solar panels will come delivered with two short cable lengths per panel.
Confusingly, unlike the rest of our system, which uses red cable for positive and black for negative. Solar panels like to switch things up and use black for both. The good news is that they will be clearly labelled, so don't panic.
Each of these cables should come with an MC4 connector already attached. One male and one female. So what you will have to do, trusty van-builder, is connect the opposite MC4 connector to the cables, which will run from your solar panels to your solar charge controller.
Top Tip
Before we go any further, don’t push any of the connectors together until you’re sure how your panels will be connected, and don’t do it before the panels are on your van!
If you like to make mistakes like me, you may have already done this. If this applies to you, scroll down to the bottom for tips on disconnecting MC4 connectors.
How you connect your MC4 connectors to the rest of your system will depend on your solar array. Of course, that's a topic for a different day, but if you have any questions, feel free to get in touch.
We assume you have either one solar panel or multiple panels connected in series. These scenarios are most likely and can be installed similarly. Note we've coloured our solar cable to make everything more visual.

How to install MC4 Solar Connectors
Your MC4 connectors are made up of a plastic housing which provides water ingress protection and a metal terminal which makes the electrical connection.
The plastic body will come as one piece, but it can be broken down and threaded onto your cables in the correct order.
Top Tip
The male MC4 terminal is crimped onto the cable and then covered by the female MC4 body.
The female MC4 terminal is crimped onto the cable and then covered by the male MC4 body.
This is somewhat counterintuitive so before you crimp anything, make sure you’ve identified your male and female terminals.
Connecting Female MC4 Connectors
- Using wire strippers or a Stanley knife, remove the insulation from the solar cable.
- Crimp the male MC4 copper terminal onto the end of the stripped cable. The easiest way to do this is with an MC4 crimp tool. However, if you don’t want to buy the tool for just a couple of uses, we recommend a set of pliers and some patience.
- Slide the base onto the PV cable. Next, slide the strain relief and compression sleeve onto the PV cable.
- Push the PV cable with the male MC4 copper terminal into the female MC4 connector body until you hear a clicking sound.
- Slide the strain relief/compression sleeve and base back onto the main body of the connector.
- Firmly tighten the base to secure your connection.

Connecting Male MC4 Connectors
- Using wire strippers or a Stanley knife, remove the insulation from your solar cable.
- Crimp the female MC4 copper terminal onto the end of the stripped cable.
- Slide the base onto the PV cable. Next, slide the strain relief and compression sleeve onto the PV cable.
- Push the PV cable with the female MC4 copper terminal into the male MC4 connector body until you hear a clicking sound.
- Slide the strain relief/compression sleeve and base back onto the main body of the connector.
- Firmly tighten the base to secure your connection.

Removing MC4 Connectors
If you’ve mistakenly attached your MC4 connectors incorrectly, don’t panic - it happens!
If you’ve attached the connectors to your cable but adequately pushed a male into the wrong female. Then you’ll need a nifty little tool like this one from Renogy. These tools make quick work of the connectors and pull them apart easily.
If you’ve crimped the female or male terminals onto the wrong cable, you’ll need new MC4 connectors. Luckily, these are only a couple of pounds each, so in the grand scheme of converting a van, this is an okay mistake!
Unfortunately, the part that has been crimped onto your cable cannot be removed, so your best bet is to sacrifice the end of the cable and start again with new connectors. Just make sure you read the guide thoroughly before crimping this time! If you need some extra solar cable to accommodate this, it’s available here.
Connecting Your Solar Panels
You should now have your MC4 connectors attached to your lengths of cable from your MPPT and have a male and female MC4 connector. Once you’ve installed your solar panels onto your roof, you can go ahead and press the MC4 connectors together, making your electrical connections.
If you have a single solar panel, simply connect the solar panel MC4 connectors to your newly installed ones. If you have multiple panels in series, connect the positive of one panel to the negative of the other, and then install your cable length as if they were a single panel.
Congratulations! You’ve taken yet another step in installing your solar panels and another step towards your dream of driving off into the energy-providing sunset.

Summary
So by now, you hopefully have everything you need to install your MC4 solar connectors safely and securely.
The main thing to remember is that the female body and male copper terminal are a pair. Then the male body and female copper terminal is the other pair.
Once you've got this, all you need to do is connect them to your solar cable and plug them in!
Good luck and happy building.
Shop Solar Systems

140W Victron Solar Panel System
£319.99

175W Victron Solar Panel System
£339.99

215W Victron Solar Panel System
£459.99

305W Victron Solar Panel System
£599.99

360W Victron Solar Panel System
£649.99

280W Victron Solar Panel System